Knowledge base » Protocol Authoring » 10. How to publish a protocol
10. How to publish a protocol
After checking the protocol for accuracy and preferences, see below to learn how to publish the protocol so it can be allocated to a patient.
Protocol Publishing
To publish a protocol, go to the Protocol Administration page, then click on the icon indicated below, next to the protocol you wish to publish.

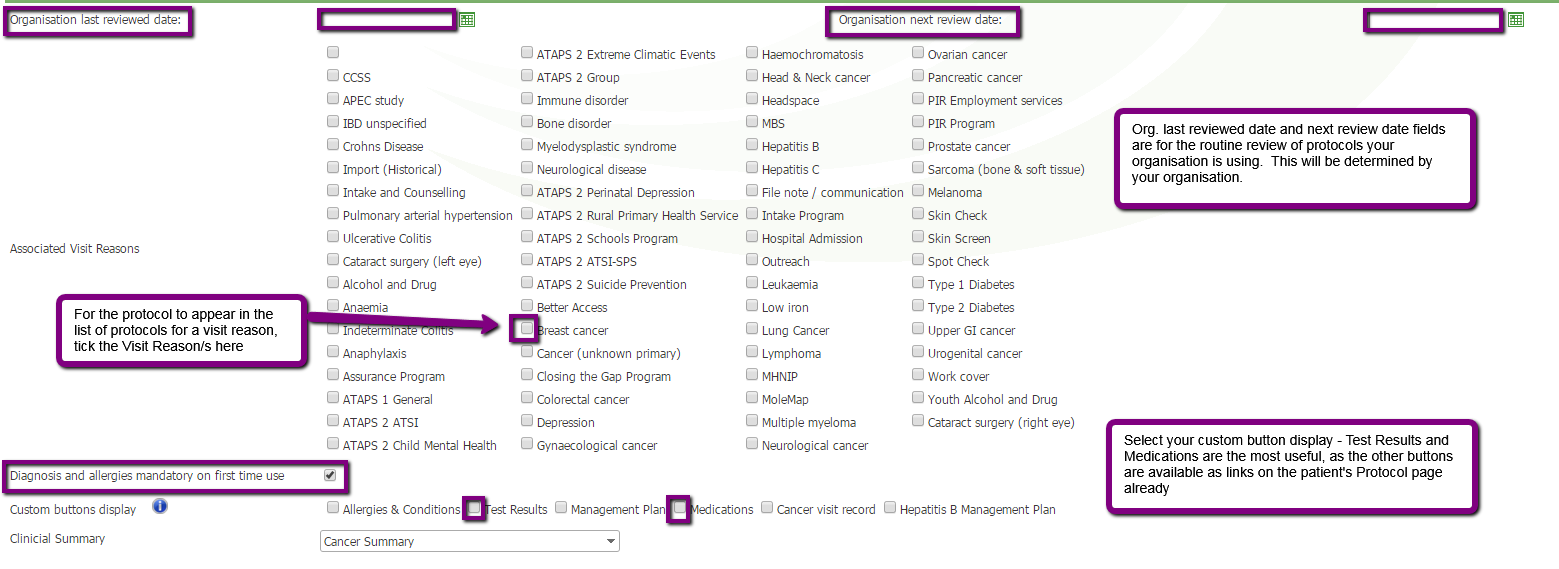
- On the publish protocol page, scroll to the bottom. Select the Visit Reason list you would like this protocol to display in.
- Enter your Organisation’s last reviewed date and next review date. This is not mandatory, but is a way your organisation can track, check and review the protocols you are using.
- Select your custom buttons to display. Test results, Medications and Allergies should be selected for cancer sites as the other buttons are already available as links on the patient protocol page.
- Tick Diagnosis and allergies mandatory on first time use if this is required
- Tick the Protocol Reporting Groups your protocol matches. More than one can group can be selected and will give visibility of the patients receiving that protocol group on the report, 'Protocol Appointments by Service Setting'.
- Save this part of the page

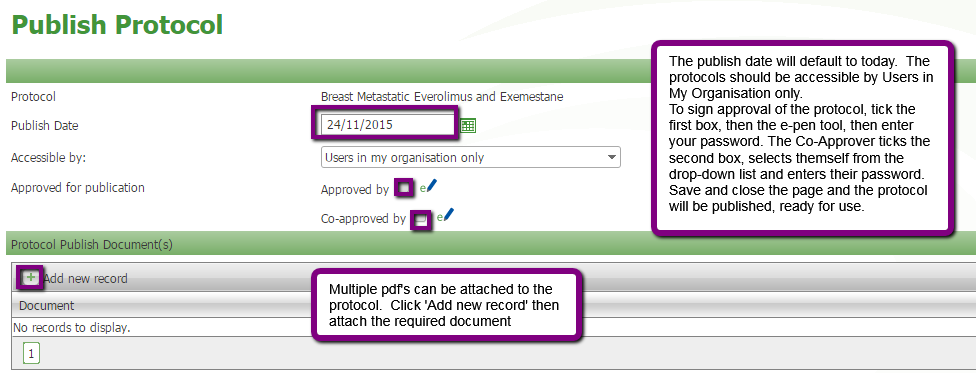
· The top half of the form can now be completed. The publish date defaults to today.
· The protocol should only be accessible by “Users in my organisation”.
· Multiple pdf documents can be attached by clicking ‘Add new record’
· Approve the protocol by ticking the box, then clicking the e-signature symbol and entering your password. The Co-approver can do the same, selecting themselves from the drop-down list.
· Now save and close the whole page.

After the protocol is signed, you must click 'Save and Close' or your signatures will not be saved.
You will be returned to the Protocol Administration page and will see that the initials of the publishers of the protocol are recorded with the date of publishing in the Publish column.

Protocol Publishing
To publish a protocol, go to the Protocol Administration page, then click on the icon indicated below, next to the protocol you wish to publish.
- On the publish protocol page, scroll to the bottom. Select the Visit Reason list you would like this protocol to display in.
- Enter your Organisation’s last reviewed date and next review date. This is not mandatory, but is a way your organisation can track, check and review the protocols you are using.
- Select your custom buttons to display. Test results, Medications and Allergies should be selected for cancer sites as the other buttons are already available as links on the patient protocol page.
- Tick Diagnosis and allergies mandatory on first time use if this is required
- Tick the Protocol Reporting Groups your protocol matches. More than one can group can be selected and will give visibility of the patients receiving that protocol group on the report, 'Protocol Appointments by Service Setting'.
- Save this part of the page
· The top half of the form can now be completed. The publish date defaults to today.
· The protocol should only be accessible by “Users in my organisation”.
· Multiple pdf documents can be attached by clicking ‘Add new record’
· Approve the protocol by ticking the box, then clicking the e-signature symbol and entering your password. The Co-approver can do the same, selecting themselves from the drop-down list.
· Now save and close the whole page.
After the protocol is signed, you must click 'Save and Close' or your signatures will not be saved.
You will be returned to the Protocol Administration page and will see that the initials of the publishers of the protocol are recorded with the date of publishing in the Publish column.


