Knowledge base » Release Notes - EpiSoft/CareZone » 28/09/16 Release Notes Protocol Authoring
28/09/16 Release Notes Protocol Authoring
Overview
We are pleased to announce our new release protocol authoring tool designed to speed up the creation of protocols. The cycles and steps are now broken up across multiple pages.
The first protocol creation page is the same and the preview of your created protocol is as per before.
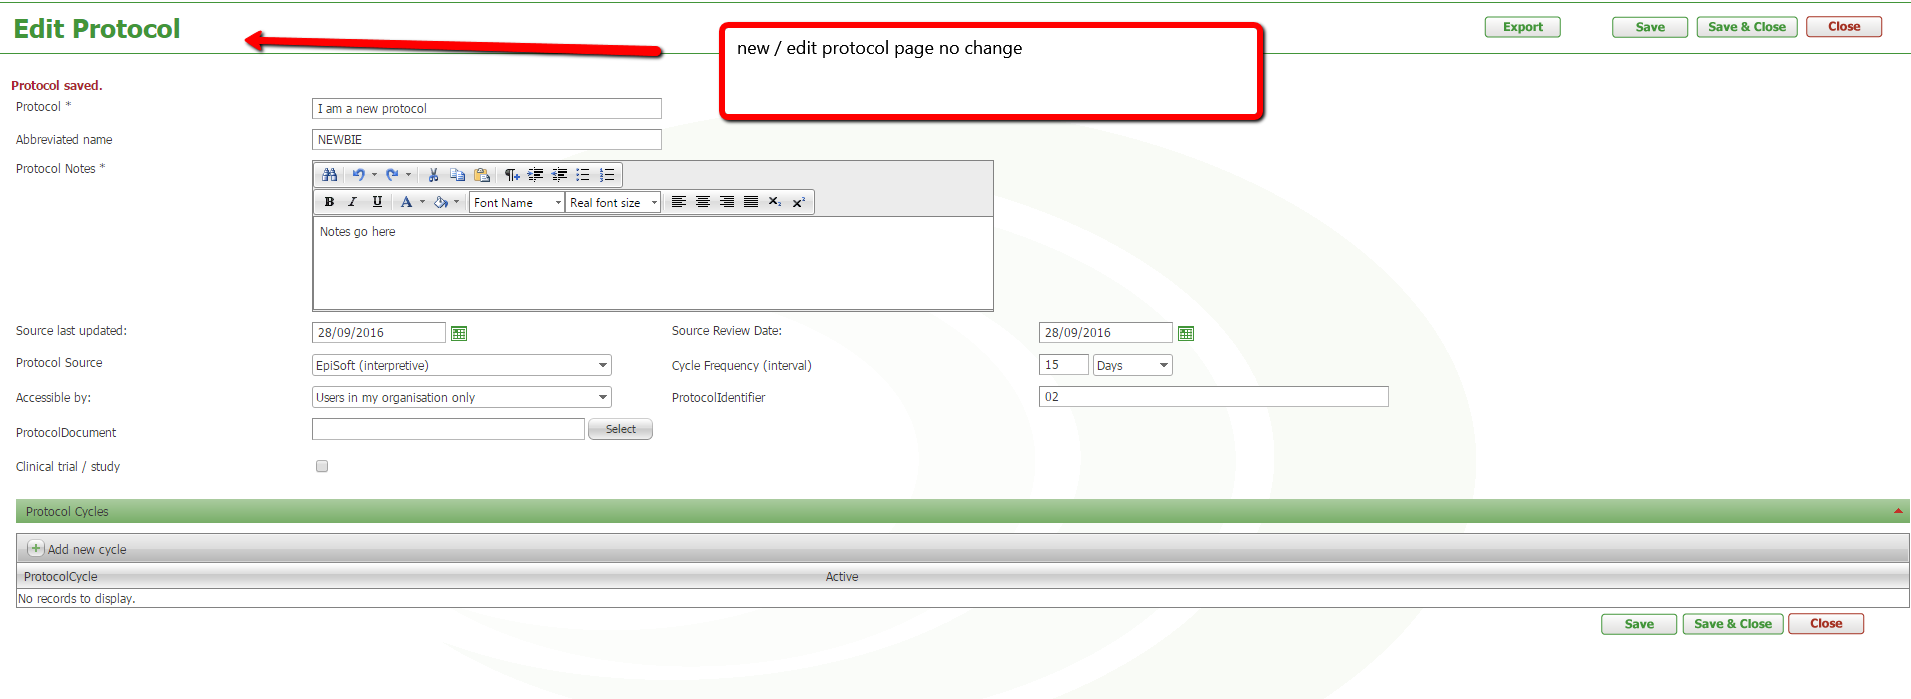
Create new protocol
The initial protocol setup / high level detail is no change from previous.
Create Cycle
Once you select this item, the structure is very different from previous setup. There is a menu left with Cycles & Steps and as you create each step, it sets up a menu option for this step and ticks when you are done with that page/step.
Start by creating your cycle - naming and setting up the signature rules. The 3 signature option is generally for Team Care / GP shared care arrangements, the 1 signature for most other protocols.
Ongoing monitoring protocols without drug orders may not require a signature.

Add medications (summary page)
Skip this step if your protocol doesn't have any medications.
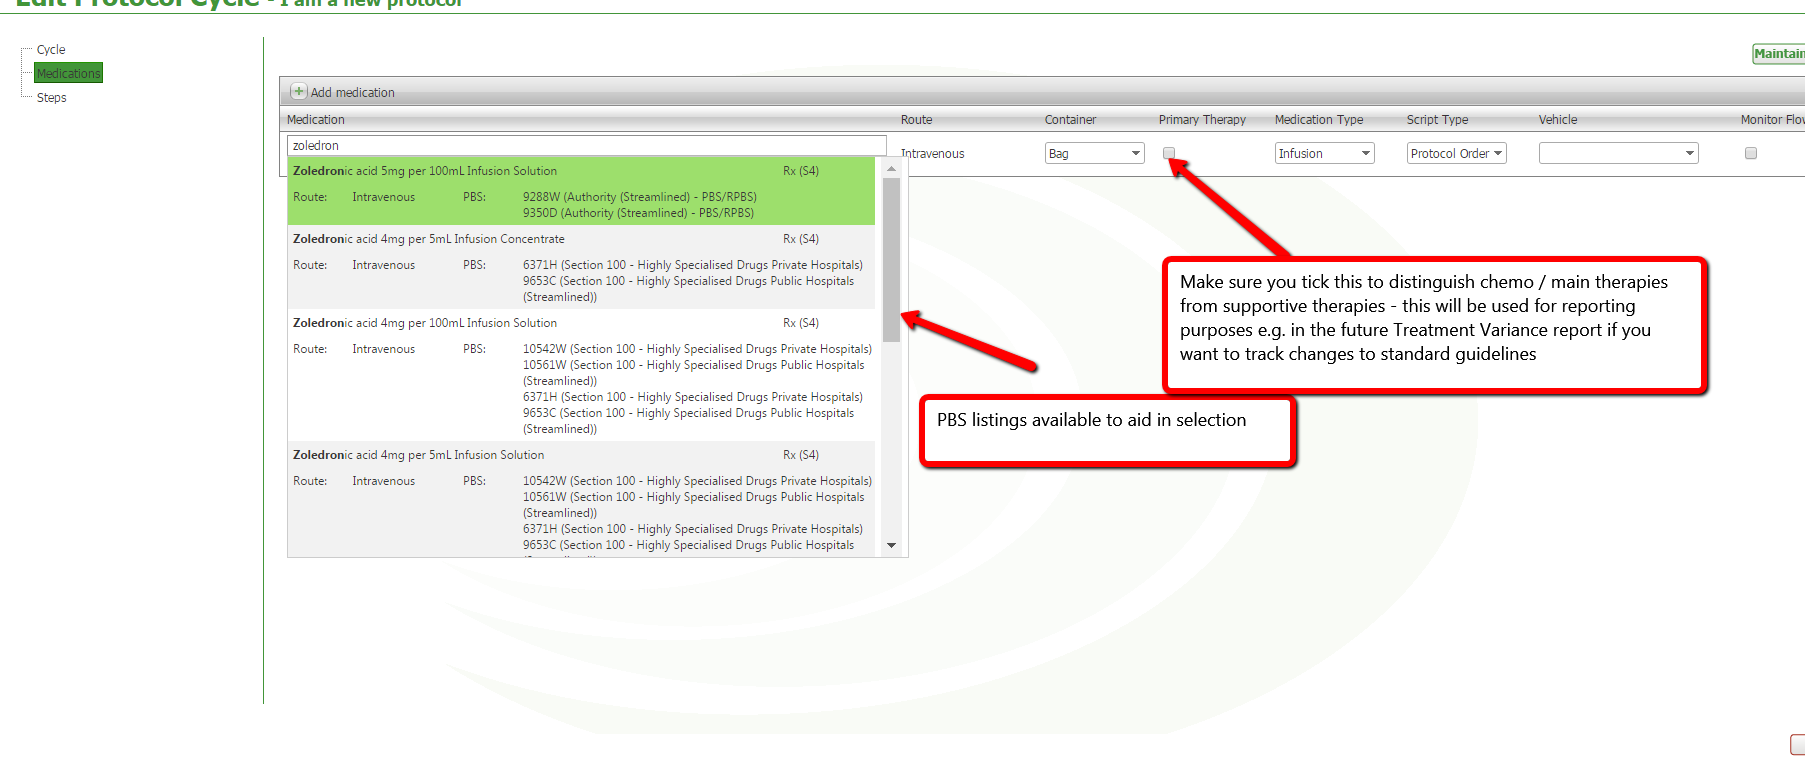
The medication search list in protocol authoring is now a TYPEAHEAD list linked to MIMS. Just wait a few seconds to give the search list time to cache on first time use in a session.
The MIMS search is medication 'Begins with...' - this varies from previous where the text could appear anywhere. This is because the typeahead list was very unwieldy with a 'contains anywhere' search. Let us know if this new search option is an issue with finding items. Dexamethasone tablets are at the end of a long list of other forms of dex so below screen shows the text that needs to be typed to save you scrolling the list...
Make sure you select the right container for your drug and whether it is an infusion or other.
IMPORTANT - if you make a mistake and need to delete a medication from this top list, it will delete from all steps below it. Make sure you save the page after delete because the X icon hides the unwanted med but the SAVE button commits the change you have made (even though it comes up with an are you sure you want to delete alert box, you still have to hit the Save button after).

Unlisted medications
The Unlisted medications can be added to in the same way as previous version but the button is on far right of the screen.
You add them to the same page as previously BUT once saved to that page return to the main Add medication page and they will be available in the typeahead search along with the MIMS drugs.
They no longer populate from the unlisted meds page.
See below.


Monitor flow rate
This is a checkbox on the medication listing. Tick this if you want to use the (future upcoming) flow rate monitoring module with the relevant drug.
Create Steps (summary page)
Next create your steps of various kinds e.g. Appointments, Medications, Procedures, Diagnostic Tests etc. You can click Add, Add, Add, to get your step list on the page before entering the data.
We STRONGLY recommend linking other steps to an appointment when applicable so that (e.g.) if drugs are administered at an appointment, the medication step always moves with the appointment and cant be changed separately. If users forgets to select recalculate future dates when moving protocols, activities that should be associated with an appointment may get left behind if you don't.
The linkage dropdown does not appear for appointment steps.

Make sure you carefully check the link to step (previously "associate step") and plus time entries on the step page prior to publication. Don't forget if drug administration occurs on the same day as an appointment, the plus time must be left as zero days.
Once you have saved the steps you will see in the tree menu far left that your step names are all there with relevant icons. You can move them up and down at the Steps summary page easily if they are in the wrong order.
NOTE the blue tick appears over the top of the icon once you have saved the step detail for the first time. It may not mean you have finished creating that step.

Step detail
You can now build big repetitive protocols quickly :-) - here is how.
1. Create a detail step as per below examples for appointment and medication. Other step types work the same way.
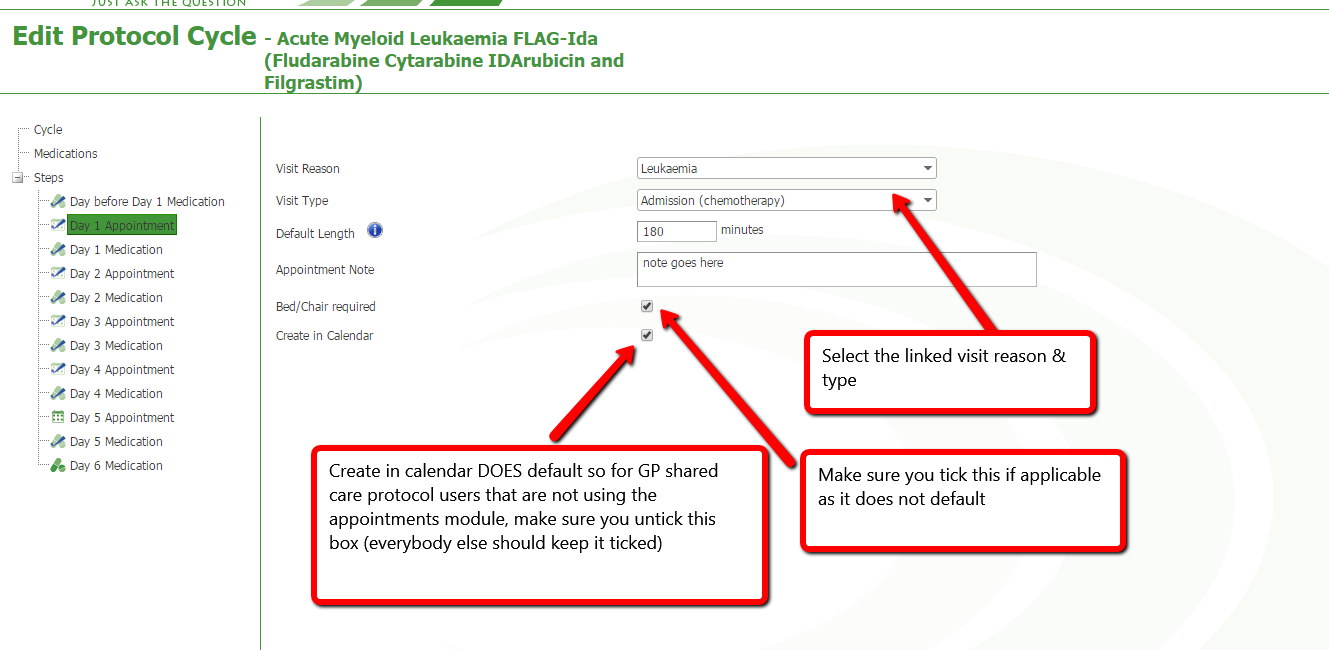
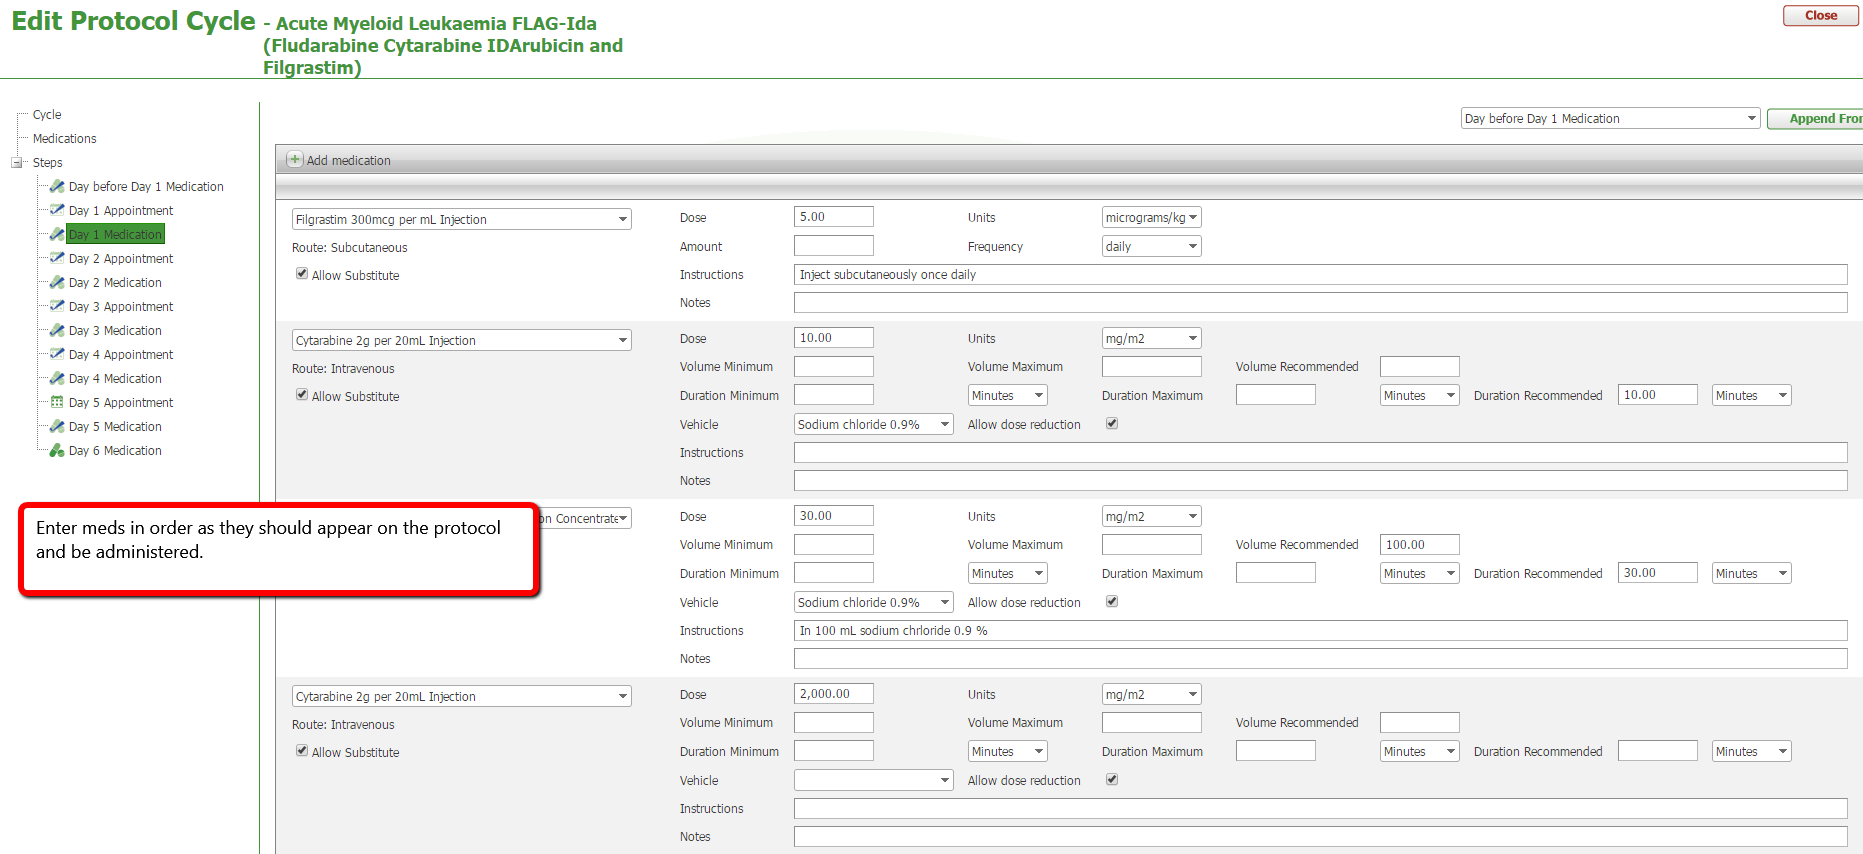
Once you have created an step or two that is the same as future ones, save the page(s) so that the blue tick appears over the top of the step icon left.
You can now copy the details from one step to another. Go to the the empty step and in the case of single functions like an appointment it will copy the various appointment parameters so select "Copy from" in the far right and select the step with data you want to clone.
In the case of medications, if you go to the new step the button will say "Append from" - see below. If you already have meds on the new step, it will add to the list. If your target medication step is empty, the "append from" will in effect act the same as "copy from".
All meds from the selected step will appear in the same order and with the same dose, volume, instruction parameters as the step in the "append from" dropdown.

Note: Please do NOT use reminders or immunisations for the time being as these step types are in beta release only.
Make sure you have a blue tick over every step before saving
A note on navigation
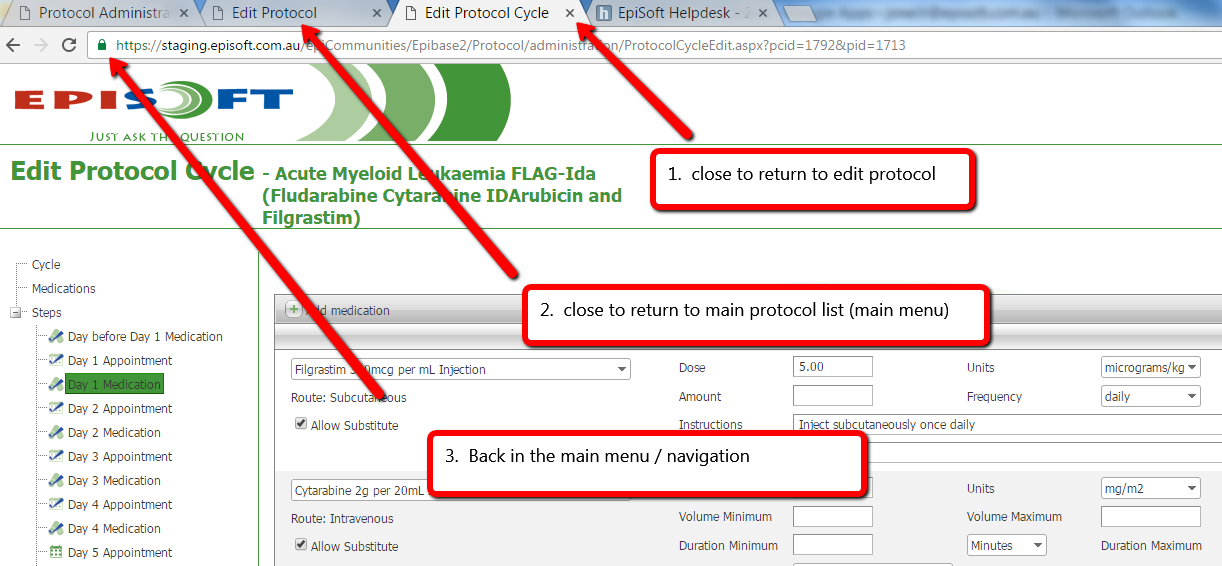
Within this tree menu, don't forget you are creating a cycle so if you Close this cycle page you are on, it will take you back to the main protocol page with the protocol name, notes and list of cycles.
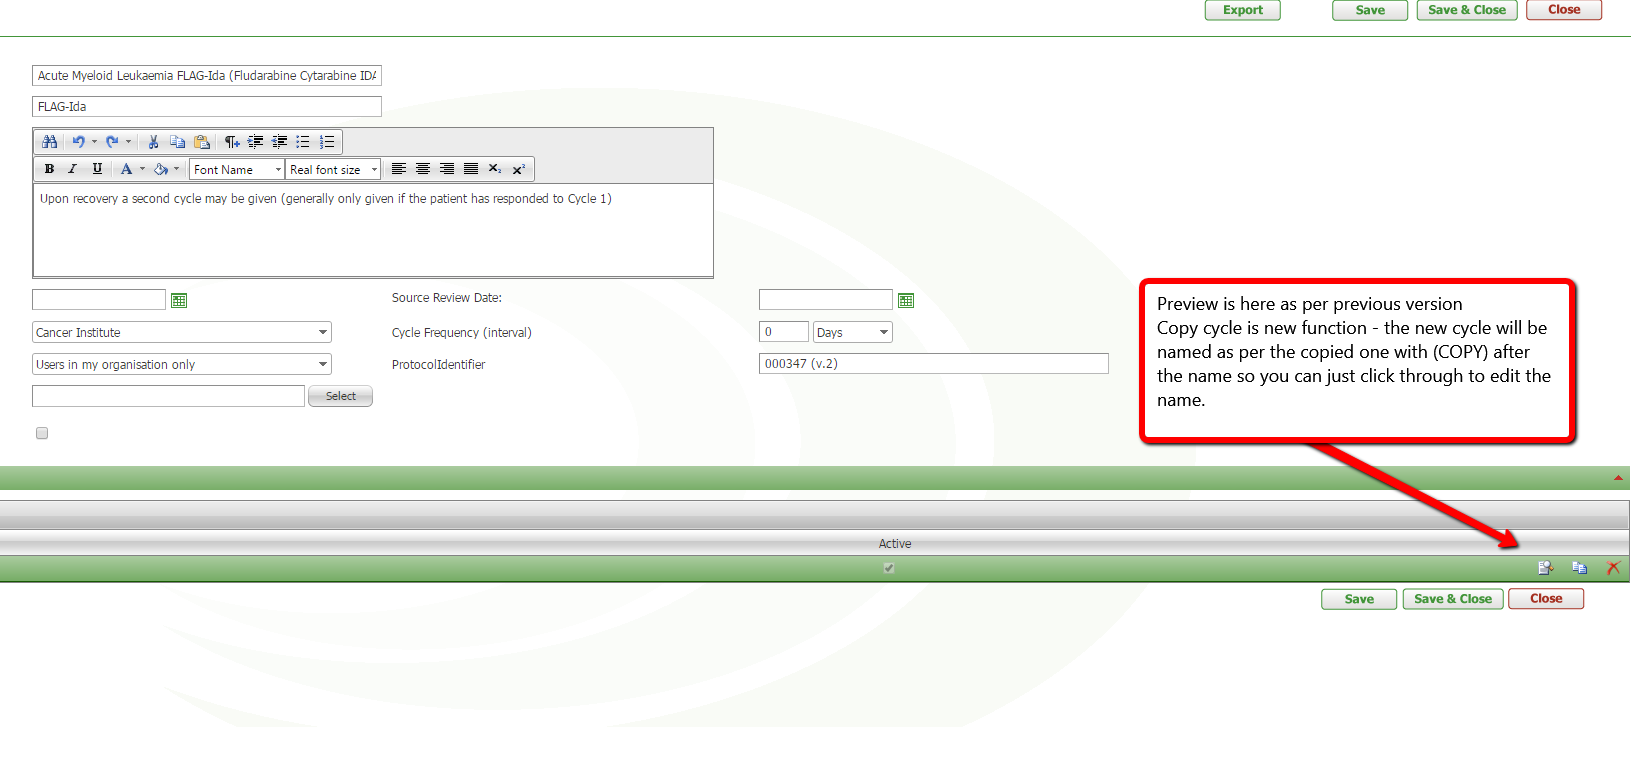
From here you can now COPY the cycle to another cycle
As per previous version, from here you can also PREVIEW the protocol cycle you have just created in the layout as it would appear for the doctor prior to publication to make sure everything is rendering as expected, drug doses are as expected and dates are calculating as expected and any linked steps have a disabled / read-only date picker.
And if you Close this main Protocol page, it will take you back to the protocol library / list (and the main menu navigation).
See below.
Below reminder as to where preview is located and also the new copy cycle function.
Publish protocol
As per now, this is via the protocol library / list.
Once you have published all the cycle, step and medication pages shown above will no longer have a Save button.
HAPPY PROTOCOL CREATING everybody.
Support on new version please email help@episoft.com.au with Attention Sally in your email.
We are pleased to announce our new release protocol authoring tool designed to speed up the creation of protocols. The cycles and steps are now broken up across multiple pages.
The first protocol creation page is the same and the preview of your created protocol is as per before.
Create new protocol
The initial protocol setup / high level detail is no change from previous.
Create Cycle
Once you select this item, the structure is very different from previous setup. There is a menu left with Cycles & Steps and as you create each step, it sets up a menu option for this step and ticks when you are done with that page/step.
Start by creating your cycle - naming and setting up the signature rules. The 3 signature option is generally for Team Care / GP shared care arrangements, the 1 signature for most other protocols.
Ongoing monitoring protocols without drug orders may not require a signature.
Add medications (summary page)
Skip this step if your protocol doesn't have any medications.
The medication search list in protocol authoring is now a TYPEAHEAD list linked to MIMS. Just wait a few seconds to give the search list time to cache on first time use in a session.
The MIMS search is medication 'Begins with...' - this varies from previous where the text could appear anywhere. This is because the typeahead list was very unwieldy with a 'contains anywhere' search. Let us know if this new search option is an issue with finding items. Dexamethasone tablets are at the end of a long list of other forms of dex so below screen shows the text that needs to be typed to save you scrolling the list...
Make sure you select the right container for your drug and whether it is an infusion or other.
IMPORTANT - if you make a mistake and need to delete a medication from this top list, it will delete from all steps below it. Make sure you save the page after delete because the X icon hides the unwanted med but the SAVE button commits the change you have made (even though it comes up with an are you sure you want to delete alert box, you still have to hit the Save button after).
Unlisted medications
The Unlisted medications can be added to in the same way as previous version but the button is on far right of the screen.
You add them to the same page as previously BUT once saved to that page return to the main Add medication page and they will be available in the typeahead search along with the MIMS drugs.
They no longer populate from the unlisted meds page.
See below.
Monitor flow rate
This is a checkbox on the medication listing. Tick this if you want to use the (future upcoming) flow rate monitoring module with the relevant drug.
Create Steps (summary page)
Next create your steps of various kinds e.g. Appointments, Medications, Procedures, Diagnostic Tests etc. You can click Add, Add, Add, to get your step list on the page before entering the data.
We STRONGLY recommend linking other steps to an appointment when applicable so that (e.g.) if drugs are administered at an appointment, the medication step always moves with the appointment and cant be changed separately. If users forgets to select recalculate future dates when moving protocols, activities that should be associated with an appointment may get left behind if you don't.
The linkage dropdown does not appear for appointment steps.
Make sure you carefully check the link to step (previously "associate step") and plus time entries on the step page prior to publication. Don't forget if drug administration occurs on the same day as an appointment, the plus time must be left as zero days.
Once you have saved the steps you will see in the tree menu far left that your step names are all there with relevant icons. You can move them up and down at the Steps summary page easily if they are in the wrong order.
NOTE the blue tick appears over the top of the icon once you have saved the step detail for the first time. It may not mean you have finished creating that step.
Step detail
You can now build big repetitive protocols quickly :-) - here is how.
1. Create a detail step as per below examples for appointment and medication. Other step types work the same way.
Once you have created an step or two that is the same as future ones, save the page(s) so that the blue tick appears over the top of the step icon left.
You can now copy the details from one step to another. Go to the the empty step and in the case of single functions like an appointment it will copy the various appointment parameters so select "Copy from" in the far right and select the step with data you want to clone.
In the case of medications, if you go to the new step the button will say "Append from" - see below. If you already have meds on the new step, it will add to the list. If your target medication step is empty, the "append from" will in effect act the same as "copy from".
All meds from the selected step will appear in the same order and with the same dose, volume, instruction parameters as the step in the "append from" dropdown.
Note: Please do NOT use reminders or immunisations for the time being as these step types are in beta release only.
Make sure you have a blue tick over every step before saving
A note on navigation
Within this tree menu, don't forget you are creating a cycle so if you Close this cycle page you are on, it will take you back to the main protocol page with the protocol name, notes and list of cycles.
From here you can now COPY the cycle to another cycle
As per previous version, from here you can also PREVIEW the protocol cycle you have just created in the layout as it would appear for the doctor prior to publication to make sure everything is rendering as expected, drug doses are as expected and dates are calculating as expected and any linked steps have a disabled / read-only date picker.
And if you Close this main Protocol page, it will take you back to the protocol library / list (and the main menu navigation).
See below.
Below reminder as to where preview is located and also the new copy cycle function.
Publish protocol
As per now, this is via the protocol library / list.
Once you have published all the cycle, step and medication pages shown above will no longer have a Save button.
HAPPY PROTOCOL CREATING everybody.
Support on new version please email help@episoft.com.au with Attention Sally in your email.


